Environment Design: Project 2 - Interior and Set Design
09.06.23 - 23.06.23 (Week 10 - Week 12)
Chai Yi Xuan / 0346645 / B'
Creative Media
Environment Design / Entertainment Design
Project 2 / Interior & Set Design
INSTRUCTIONS
To-Do List:
- Expand on current environment design and create one set of interior room
Week 11
I planned to design the final boss arena, which is located on the roof top and pretty much visible from the outside. I already did some sketches from Project 1, so I just expanded on it. I also did a very simple blockout of my temple in Blender so I can get the perspective right.
 |
| Figure 1.1: Blender blockout screenshot #1 |
 |
| Figure 1.2: Blender blockout screenshot #2 |
 |
| Figure 1.3: Battle arena sketch #1 |
 |
| Figure 1.4: Battle arena sketch #2 |
Week 12
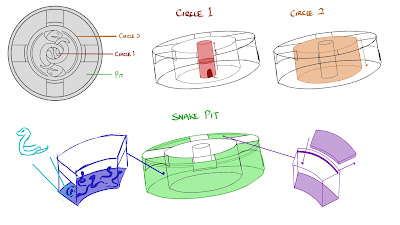
Taking Mr Kannan's feedback into account, I did a brief sketch of how the battle arena functions as the battle goes on. It doesn't take me long to finish this part.
 |
| Figure 1.5: Arena platform breakdown and functions |
I made more amendments to one of the sketches and did a colour test to see if which colours would go better. I'm still sticking with the same colour scheme I used for Project 1 for consistency, and also used purple crystal to match my antagonist's colour palette. It took a while to render my scene, but I was quite happy with how it turned out.
 |
| Figure 1.5: Battle arena, refined |
 |
| Figure 1.6: Quick colour test on battle arena |
 |
| Figure 1.7: Rendered interior set |
PDF presentation file for Project 2
FEEDBACK
Week 10
Indicate where you can access to the battle arena. Add more snake motifs around the place. Imagine how the player will interact with the arena and build your concept around it.
Week 11
Draw out the functions of your arena platform in a different sheet. Add some details to the spike, like symbols or cravings (don't overdo it). For the pillars, evaluate what details you want to keep, and what is the main shape you want for the pillars. There's no need for detailed carvings, blur out the things you can't see clearly. For the center platform, don't need to draw snakes in the pit. The details of the cover can be blurred out (the further away it is) and add some pathway patterns to create movement.
Week 12
Take your grey scale and put it over your coloured layer, and change the layer to multiply. Add shadows and highlights, and evaluate if it makes sense. Photobash texture onto surfaces that need them.
REFLECTIONS
Having done the exercise and Project 1 for this module, things get a little bit more easier for me to do. Experience is the best teacher, after all. Blender was really useful, and so much more easier for me to sculpt compared to ZBrush, though we are not modeling characters in this project. Besides the point, it really helped me in seeing the place in perspective and I didn't need to rely on my on imagination. I actually sculpted half of the temple in Blender, but didn't finish it since I really only needed it to check my perspectives. I'll probably do it in my own spare time.


Comments
Post a Comment