Vehicles & Props Design: Projects & Compilation
23.09.22 - 12.12.22 (Week 4 - Week 15)
Chai Yi Xuan / 0346645 / B'
Creative Media
Vehicle & Props Design / Entertainment Design
Projects & Compilation
INSTRUCTIONS
To-Do List:
- Develop 5 designs for each type of vehicle (land, water, air)
- Select one to further develop (interior, props)
- Showcase final design of selected vehicle
Projects:
- Project 1: Pre Production
- Project 2: Production
- Final Project: Post Production & Profiling
Project 1: Pre Production
Week 4
To start off the project, Mr Kannan told us to think of the type genre/universe we want to design our vehicles for. It is advised that we pick something we like so we wouldn't get bored or frustrated with it further down in development. I decide to go with a fantasy/steampunk genre, since I like fantasy. I wanted more flexibility in narrative, so I came up with simple universe to fit my needs.
 |
| Figure 1.1: Universe description |
After I figure out the type of universe I wanted to do, I thought of the possible vehicles needed. Since the main source of power in my universe is crystals, I thought that I could design the vehicles needed to mine and extract these crystals.
.jpg) |
| Figure 1.3: Moodboard, water vehicle |
.jpg) |
| Figure 1.4: Moodboard, air vehicle |
Week 5
After gaining some references, I started designing the vehicles. Despite having an idea in my head, it was hard to translate it on paper. Either the design doesn't work out or I couldn't draw it well enough. It was a long process of trying visualise the vehicles. In the end, I barely drew anything because I got frustrated trying to ideate the designs.
Week 6
I consulted Mr Kannan for some advice on designing my vehicles. After some discussions and reviewing some of my peers' work, I have a better idea on what to do. It's still a very long process, but I took a breather every now and then so I don't burn myself out too quick. Finally, I managed to sketch out the designs for all three vehicle types.
 |
| Figure 1.5: Thumbnail sketches, land vehicle |
 |
| Figure 1.6: Thumbnail sketches, water vehicle |
 |
| Figure 1.7: Thumbnail sketches, air vehicle |
Week 8
After receiving some feedback from Mr Kannan, I decided to pick one design from each vehicle and further develop with details.
 |
| Figure 1.8: Variation, land vehicle |
 |
| Figure 1.9: Variation, water vehicle |
 |
| Figure 1.10: Variation, air vehicle |
Week 9
Again, I picked one of the better sketches and drew them out in details with clean lines. This process is less stressful since the designs have mostly been finalised. I then created a breakdown for each vehicle.
 |
| Figure 1.11: Land vehicle breakdown |
 |
| Figure 1.12: Water vehicle breakdown |
 |
| Figure 1.13: Air vehicle breakdown |
Week 10
With the details all finalised, all I have left is the colour scheme. I try to explore various colours for each vehicle to see which works out best, while still sticking to the steampunk theme. After selecting the colour scheme, I place all my files into a presentation slide for submission.
 |
| Figure 1.14: Colour exploration, land vehicle |
 |
| Figure 1.15: Colour exploration, water vehicle |
 |
| Figure 1.16: Colour exploration, air vehicle |
PDF presentation file for Project 1
Project 2: Production
Week 11
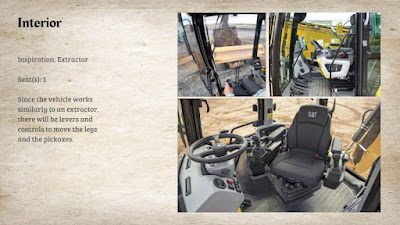
Moving onto the second phase, we only needed to fully develop one vehicle interior and its props. I selected the land vehicle to develop and thought of its possible interior and props
 |
| Figure 2.1: Moodboard, vehicle interior |
.jpg) |
| Figure 2.2: Moodboard, props |
Week 12
Initially, I wanted to do multiple perspectives to get a full view of the interior of the vehicle. I was advised against it, though, as it would take too much time to complete.
 |
| Figure 2.3: Initial idea for interior view |
 |
| Figure 2.4: Selected interior view |
Week 13
I cleaned up the sketch with better lines and added more details to the interior. Then, I explored the colours for the interior. Once I was satisfied with the colour, I rendered it.
 |
| Figure 2.5: Line cleanup |
 |
| Figure 2.6: Interior colour exploration |
 |
| Figure 2.7: Rendered interior |
Week 14
The prop I have that comes alongside with this vehicle is a gas mask with a pair of goggles. I mostly stick to the references I saw on Pinterest, just adding on more steampunk elements if it fits. I didn't spend too much time on this, as I have more to do for Final Project.
 |
| Figure 2.8: Mask ensemble sketch |
 |
| Figure 2.9: Mask ensemble, clean up |
 |
| Figure 2.10: Mask ensemble, colour |
 |
| Figure 2.11: Mask ensemble, rendered |
PDF presentation file for Project 2
Final Project: Post Production & Profiling
Week 15
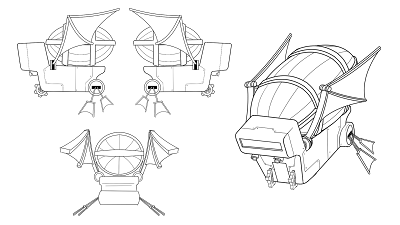
We were expected to have the orthographic of all three vehicles we designed and one key artwork for our selected vehicle. I worked on the orthographic in previous weeks alongside the other designs, so I didn't have worry too much about it.
 |
| Figure 3.1: Orthographic, air vehicle |
 |
| Figure 3.2: Orthographic, land vehicle |
 |
| Figure 3.3: Orthographic, water vehicle |
It took me a while to render the vehicle, because I'm not good with shading materials. In the end, I did my best to get it right, though there is room for improvement. My key artwork would be in the crystal cave, since that's where vehicle would be put to use.
 |
| Figure 3.4: Rendered vehicle |
 |
| Figure 3.5: Key artwork |
PDF presentation file for Final Project
FEEDBACK
Week 7
Add more details to your land vehicle. You can also break them into multiple sections. You can try to add a grater to the exhaust pipe and add more corner to the main body so it doesn't look flat. For the water vehicle, you can try having the drill coming out from the front. Your air vehicle has too many wings next to each other, remove a few so they won't hit each other (in application).
Week 9
Your land vehicle looks good— can proceed with design #4 and add on the pickaxes back in front of the vehicle. For water vehicle, design #1 or design #2 is good. You can add a gear part at the front for the air vehicle, half protruding and add more line breaks.
Week 12
Interior looks good, but just stick to one view or you won't have enough time to finish it. Add some wires or pipes here and there and make your panel protrude/extrude to create dynamic.
REFLECTIONS
The continuous development of vehicles is pretty taxing for me. The idea and notion of it was fun, because I thought I could be more lax with designing the vehicles, but I was proved wrong. There is a need to study up the vehicles we are trying to reference to, so that we can implement the basic structure of these vehicles into our design. It involved so much thinking that I felt like I had to crack my brain to get things to click. Hence why I took so much time to just get thumbnail sketches done. It is through repeated feedback and constant practice that things finally stuck with me, and I could draw at a faster pace. The biggest challenge for me is rendering material textures, which by now am still unable grasp a proper understanding. This would be a personal goal of mine, to better understand and effectively render textures. After this module, I have a newfound respect for designers that dabble in vehicle design. Knowing how much effort is needed to get to the tiniest of details, I find it admirable that they could conceptualise such ideas and make them appealing and believable.
.jpg)


Comments
Post a Comment